
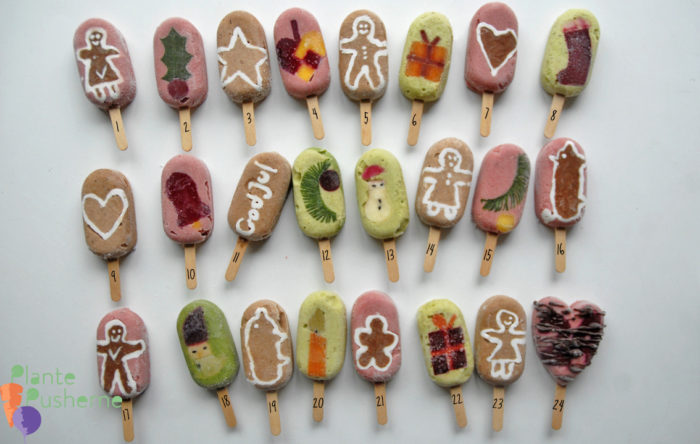
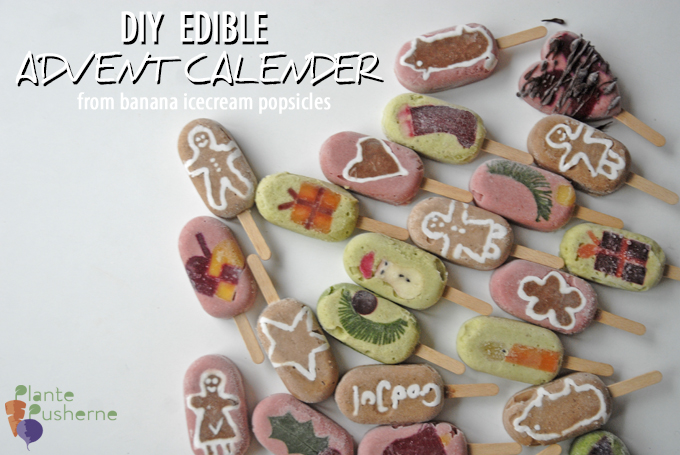
So last year I came up with this brilliant idea of an edible advent calender for my daughter. As brilliant as the idea itself was, as horrible was the timing. It was the middle of december and count down to Christmas was aready half way through. But I still went through with it for the sake of passing on the idea. So I made 24 banana ice cream popsicles, saved enough for my daughter to eat through the rest of the count down and brought the rest to her Kindergarten. Evereyone was happy! Excpt my inner perfectionist whhich was still slightly bitter at the horrible timing. (But we finally settled with the fact that for NEXT year, we were incredibly well prepared). I started sketching as soon as I could and the next day holiday inspired banana popsicle production began. The icecream itself itself is as usual made of ripe bananas. If you’ve never heard of banana icecream, Google it. Your life will never be the same. You’re welcome. The green ones are colored with a little spinach (blend with tiny amount of water, strain, use liquid), brown is made with cocoa and the pink ones with a little beetroot juice. The first two batches I threw in an ice cream maker. The green ones are made with some banan/spinach smoothie which I was making for lunch anyway the day after. You can of course use any favorite icecream recipe you have but you want it to be not too stiff since it’s easier to pour the ice cream into the molds rather than scooping and tucking.
For cutouts I used banana and apple dipped in tangerine juice. Furthermore, there is a thin slice of cooked cauliflower in a gnomes beard somewhere. I also cooked both a whole beet root and a whole carrot and cut thin slices with a vegetable peeler. They loose a lot of color if you boil the slices on their own. These were then cut into shapes. I used Nigella seeds for the eyes and the candle wicks. Some things are made with cookie cutters and some I actually cut with small scissors. It was good ol’ Christmas cutting – just starring cooked vegetables.

I wanted to make a simple little Braided Christmas Heart (danish tradition, normally made with colored paper) of beetroot and carrot. It was not particularly difficult but the beetroot colored everything red so you couldn’t see the details (left in picture). It worked better to cut out the squares separately (‘braided’ heart to the right in this picture) .

The parcels are made by first cutting a square and the cutting it twice to get 4 small squares. They were put in the moulds and then I cut the ribbon from a boiled carrot slice using a knife. The silicone molds are so smooth that you can easily move things around, take them up and cut until they fit. The spruce branch branch is made of a spinach leaf where I first cut away one half of the leaf and finally cut ‘fringes’ in the second half and twisted it so spruce needles were spread out a little. Especially beetroot leaks insanely amounts of color so I put the slices on some kitchen paper before cutting. Otherwise the color will float and color the surroundings. For the same reason, it may be an idea to start freezing beetroot cutouts lyimg in the mold before you put down the rest of the cutout – like you see I did with the braided heart in the image below.
 To get the cutouts lying completely flat in the silicone mold I dabbed a tiny bit of agave syrup on the side facing down. The outline of the ginger bread figures are made by taking the fat part from a can of coconut milk and stir until it is free of lumps. I put it in a small funnel made of a piece of wax paper (not parchment paper ). I recommend practicing a bit before you start drawing in the molds. And remember that words need to be spelled backwards 😉 I stuck to Merry Christmas which luckily is only 6 letters (God Jul) in Danish.
 Pop them in the freezer so the coconut cream wont be pushed around when you pour the ice cream.
When adding the ice cream, it is important to make sure that the ice cream is up to close around the shapes to avoid air pockets in the finished popsicles. I poured just a little to begin with and distributed it closely around the coconut cream figures with a toothpick or wooden skewer. If your ice cream is very liquidy when you pour it you don’t need to be so carefull at this point (but on the other hand crystals will form in the popsicles).

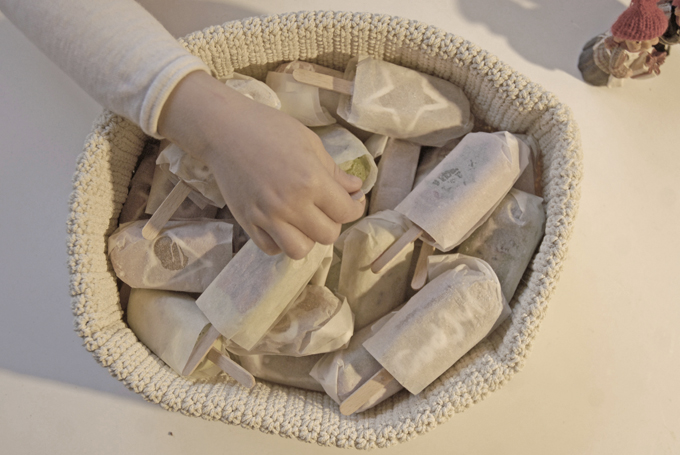
 I usually pack the finished popsicles into small pieces of ‘lunchbox paper’. Wax paper will do as well.
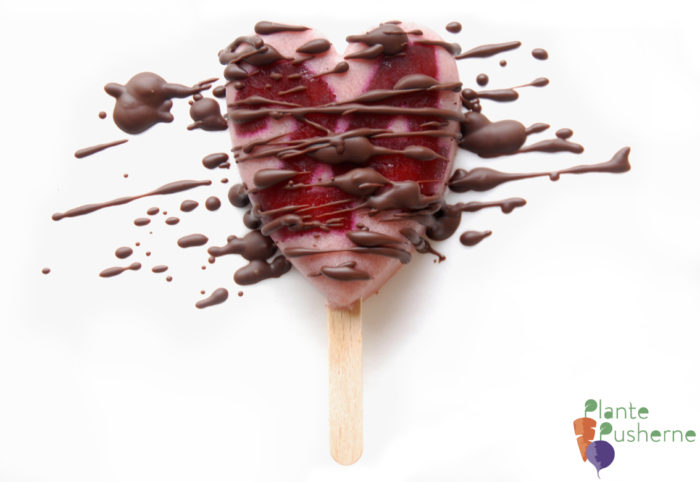
 Of course the last popsicle (number 24) needed to stand out. I made it heart-shaped, filled the middle with dark melted chocolate and cut out the number 24 from cooked beetrot. When frozen, I drizzled it with even more melted chocolate. There was so much chocolate in that you can hardly see the rest of it, but hey, it’s chocolate, right?
 Throw all the popsicles in a basket or box. You might want to split it into two batches so you don’t need to pull all of them out every day. Because everytime you pull them out into room temperature a tiny layer of ice will form on top of them.
Tips
– I’m using these moulds but any lying down type moulds should do.
-Your DIY advent calendar with banana popsicles can be made well in advance. And actually you don’t have to have ALL of the popsicles ready for the first day of the countdown. The rest can be made along the way.
Good luck and happy holidays – or whatever you are celebrating and need to count down for 🙂

(This blog post contains affiliate links, I earn a small commission for your purchase, but it’s not costing you a dime extra. Thanks for your support and please don’t buy anything you won’t be using 😉 )
What a lovely and brilliant idea! And so healthy yet playful for the little ones.
Thanks for the huge inspiration!
Moran
Thanks, I’m glad you like it – you are very welcome 🙂
Best regards
Nina